
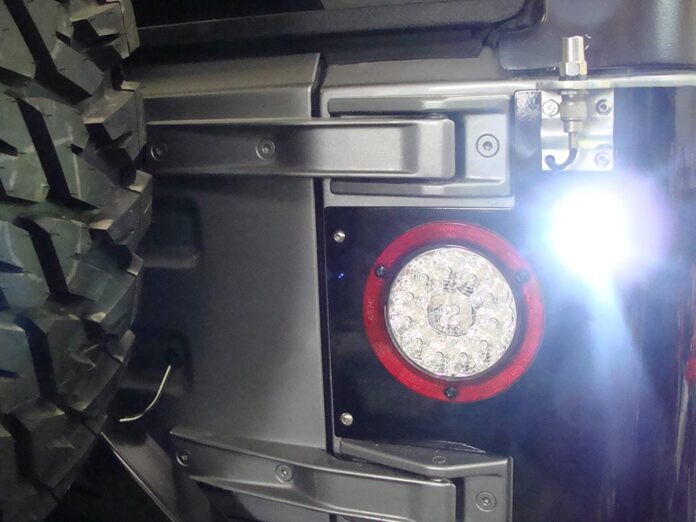
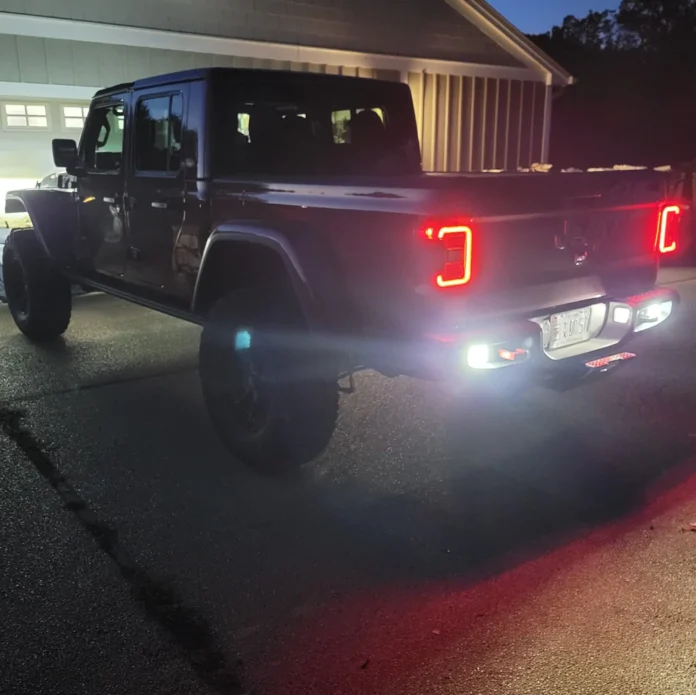
Many people are looking for ways to save money on car maintenance costs. One way to do this is to install LED backup lights. Nobody can ignore the significance of backup lights for a car. Compared to the halogen lights, LED backup lights are a greater way to improve visibility while backing up your car. They are also very easy to install, and only require a few tools.
With a bit of time and effort, you can save yourself some money by installing LED backup lights on your car.
Why You Need LED Backup Lights
If you’re looking to improve your safety on the road, one of the best things you can do is install LED backup lights. These lights are much brighter than traditional incandescent bulbs, and they’ll give you a better view of what’s behind you when you’re backing up.
There are a few different things to consider when installing LED backup lights. First, you’ll need to decide where you want to mount them. Many people choose to mount them under their bumper, but you can also mount them on your roof or in your trunk.
Once you’ve decided where to mount your LED backup lights, the next step is to wire them up. This is usually a fairly simple process, but it’s always a good idea to consult with a professional before tackling any wiring project.
Finally, once your LED backup lights are installed and wired up, you’ll need to test them out to make sure they’re working properly. Backing up in an empty parking lot is a good way to do this.
Installing LED backup lights is a great way to improve your safety on the road. By taking the time to install them properly, you can ensure that they’ll work well and provide you with the visibility you need when backing up.
Step By Step Method To Install Led Bulbs

Installing LED lights could be the answer for you if you’re looking for a quick and straightforward approach to changing your car’s appearance.
By installing these lights, you can give your automobile a wonderful, unique glow that will attract attention on the road.
We will step by step explain to you the process of installing the LED lights, so there is no scope for error.
You will need specific tools to carry out the process, including LED Lights, Screwdriver, Wire cutters, Tape double sided and the Driller. Here, we recommend buying LED backup lights from this website.
Instructions
Step 1: Collect all your tools that is required
Before starting, prepare your car by removing the body panels you will be working on. If these lights are utilized improperly, working with them can become quite dangerous, so be sure you are aware of all safety measures.
Step 2 : The LED light preparation for installation
Just to make sure that your LED light is functioning properly, do a pre-check. It should be working properly and should be trouble free. When you are sure that they function, use the plastic clips that were provided with the lights to prepare them for installation.
By firmly pressing on the connection, you can lock them in where you want to put them.
Step 3: The Wiring system of the car should be checked.
Find both positive and negative wires you’ll need to connect the battery’s positive and negative ends to the lights using the wiring diagram for your car.
Lighter colors represent positive power, whereas darker colors represent negative lines. Use this information to avoid being puzzled and making a mistake when running your wiring later on.
Step 4: Preparing wires to install
Once you have checked the positive and negative wires, you will need to prepare them for installation. Each wire’s coating can be partially pulled off with a wire stripper to show the surface of the metal below.
Ask someone experienced to help you if you are uncomfortable with this type of work so they can take you through fixing these lights.
Step 5: Run wires through body panels using soldering.
Prepare your wires, then join them together to create a single, long cable that can be passed through your car’s side panels.
Step 6: Make Installation Holes in Your Car
Make the desired hole in your car for the LED light by drilling it. As some cars contain plastic in certain spots. Be sure you are drilling this directly into the metal of the vehicle.
Step 7: Through the drilled Holes, Connect Your Wires
Run your wires through the holes you’ve already made where you want to install your LED lights.
Push down on each wire as you pass it through one at a time to ensure it doesn’t get trapped along the way!
Step 8: Your Wires Should Be Connected to the LED Light
You can now join your wires and lights after they are prepared. Before proceeding to the following step, ensure all of the wirings for each light is connected to prevent any loose wires from remaining.
Step 9: Use the power in your car’s battery Straight to the Lights
Run a connection directly from the area nearest to where you wish to install your LED lights to your vehicle battery or any other portion of it.
Step 10: Enjoy Testing Your New LED Lights!
Once installed, your new LED lights can easily connect straight to your vehicle’s battery to test their functionality.
Final Words
When determining whether the lights are functioning correctly, turn on the car’s engine and press the clutch while it is backward.
If not, take out the connector, rotate it, and reinstall it. Since LEDs are voltage sensitive, the vehicle assembly must connect them correctly. Once the steps have been completed, your car will have two brand-new LED backup reverse lights installed.


")